Git Basics – Branching, Merging and pushing code to Github
If you’re reading this, you hopefully have a basic understanding of what git is, and you know what purpose websites like Github, GitLab and Bitbucket serve. If you don’t, 😱 fear not! I’ve got you covered 👇.
Prerequisites
- What’s the difference between git and Github?
- An introduction to git for beginners
- Command Line basics – Codecademy – (not strictly required but it will make your life easier)
In this post, we go a little deeper into using git than my introduction did. Using git can feel scary initially because of how powerful it is, but the only way to overcome this is to practice (in an environment where you can break things!), so – let’s do just that.
Contents
- Setup – Forking and cloning a repo
- Creating your first branch
- Merging your branch into master
- Creating a pull request on Github
Setup – forking and cloning an existing repo
I’ve put a git repository on Github as a starting point which you can download to save time. Before you download that, let’s start by ensuring you’re in the folder you want to be in.
First, open your terminal and navigate to where you want to place the repo, using the cd command (assuming you’ve read up on command line basics). You might want to create a /code or /playground folder for all your tutorials, like so:-
mkdir code
cd code
mkdir folder_name“make directory” – makes a folder with given namecd folder_name“change directory” into path provided (cd ..jumps into the parent directory of the current one)
Next, you want to click fork at the top right of my Github repo page (via the link provided above). A fork is simply creating your own personal copy of my starter code, which you can see in your Github profile. Any changes you make to your fork won’t affect the original repo (unless you merge them in as we do at the end).
On your fork of the repo, click the green Clone or download button


Copy and paste the repository link provided and git clone the repo into your own folder like so (replace your_username)
git clone https://github.com/your_username/git_basics.git
cd git_basics
git remote add upstream [email protected]:webtuu/git_basics.git
git clone– simply downloads / clones your forked code, on to your own machine.cd git_basics– navigates you into the cloned git_basics foldergit remote add upstream– adds a reference point to our main repository (for use later)
What you have now is one local branch and two remote branches. origin is the remote branch where your fork lives. You can read and write stuff to this remote.
You have also just added upstream – this points to the main project’s GitHub repository. You can only read from this remote.
A “remote” in git, is usually a branch that lives on a git hosting service, or on a server somewhere, as opposed to your local branches.
Nice work! You’ve just forked and cloned a project on to your own device. Give the following commands a try to give you a better idea of what you’ve just downloaded:-
ls
git log ls– short for list, this will list all files and directories in the current foldergit log– this will give you a log of existing commit messages with their author and time (press Q to exit the dialog). Only works if you’re in the correct directory level.
You’re now ready to begin some branching work!
The next step is to open up your text editor. You may have a preference for which IDE / Editor you use – mine is Atom, which I can open up from terminal using the following command (from whichever folder I want to open up).
atom .If you want to set this shortcut up for yourself, you can do so with the following command on Macs (and restarting terminal) – otherwise, just Google “How to open Atom via terminal”.
ln -s /Applications/Atom.app/Contents/Resources/app/atom.sh /usr/local/bin/atom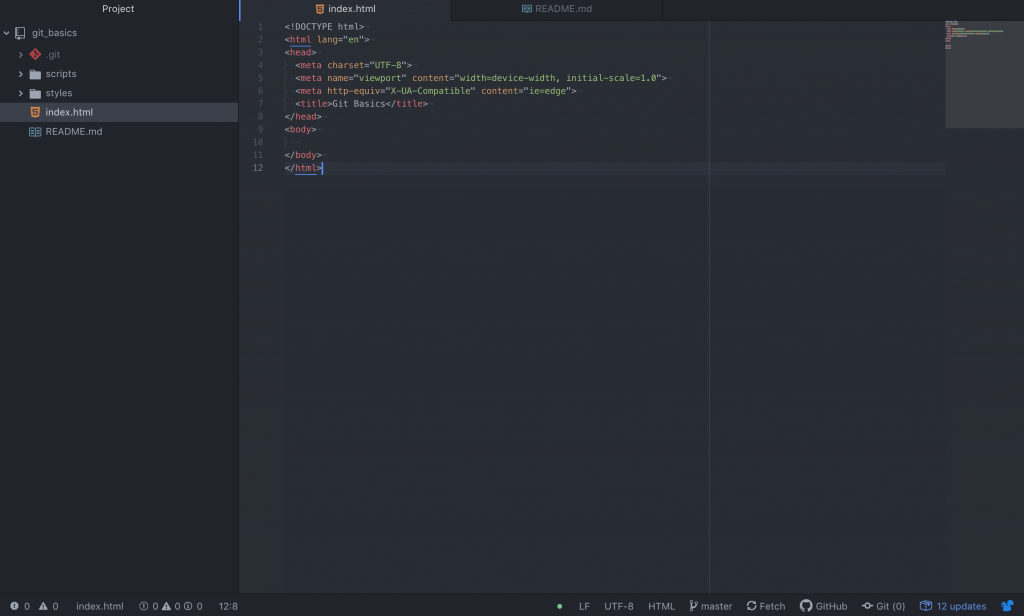
Notice Atom tells me which branch I am currently in (master) in the bottom right, which will prove useful later on.
Creating your first branch with git branch
Git branches are best explained by example. Every repository starts off with one branch – master. The master branch remains the main branch, through the entire git project. Branches are basically different copies of the same codebase, and allow you to work on multiple different versions at the same time.
A new branch should generally be created for any code change that is to be made to a codebase, like a new feature, or a bug fix.
Say you started a new role as a Junior Developer. Your team has created a blank project template for a new product, and have tasked you with developing a new header for the website.
Your first step is to create a new branch, named appropriately, to isolate your work on the new feature. You can safely develop your work on there, whilst leaving the master branch untouched. If your work is good (perhaps determined by a review from another dev), it’s then fit for being merged into the master branch (usually done on Github if working in teams), and your new code can be made live on your production website.
Let’s pretend we’re in the (realistic) situation above, and give this a shot. To start off, we create our new branch.
Important: Branch naming here is important. Later on, you will be pushing code up to Github, and will want to have a unique branch name to avoid clashing with others. Please follow the convention of using your initials, your birth date (or just a random 6 digit code is fine), followed by /new-header. For example, my branch will be wt210788/new_header
git checkout -b your_branch_namegit checkout -b your_branch_name– this command will create a new git branch that is a copy of whatever branch you are currently in, and then navigate you into that branch. The-bflag is only used for branch creation, so afterwards, you can simply use the command without-bto shift branches. Usually, you would make this from your master, or a development branch since they should contain the most complete or known working code.
You should now be in your new git branch – check this by running
git branchgit branch– gives a list of your current locally available branches
Let’s make some changes now, and commit them!
If you’re using the cloned repo, copy and paste the following code into your index.htmlfile, inside your <body> tags
  <header>
    <img src="https://i.imgur.com/4uM708u.png" alt="Git Basics Header">
  </header>
Hit CMD + S to save your edit in your chosen editor. Let’s view what changes we made with git diff in the terminal (this is useful for when editing many files at once, in a larger codebase)
git diff git diff– shows the “diff” or difference/change in files since your last commit. The diff will only show unstaged changes, so won’t show anything after you stage files withgit add .. (Use Q to exit the dialog)
Next, we commit these changes to our branch.
Author/Email Setup
Note: Before making a commit – ensure you have set your name and email address for your commits, mentioned in my Intro to Git (this only needs to be set once)
git config --global user.name "Your Name Here"
git config --global user.email [email protected]
Let’s now stage the file to be committed, and commit it with a meaningful message like so
git add index.html
git commit -m "Added a basic header with an image"
Use git log again after making the commit, and you will see your commit has been added. Hurrah!
Merging your branch into master
We now have a shiny new header (though admittedly, a very low effort one) to merge into our master branch and get it into production (“production” is the industry term used for live product/website – i.e. where real people will be using it).
Method # 1 – Merging your branch locally
There are two ways to merge this into master. You can either merge the branch with the following code (We recommend you follow Method # 2 for this example, to get practice with Github – if you do Method # 1 first, you won’t be able to do the rest of the tutorial)
git checkout master
git merge your_branch_name
git log
git checkout– changes the current git branchgit merge branch_name– merges branch_name into the current branch. Usegit branchif you forget the branch name.git log– log of commits, to check your commits have been merged to master
…or you can merge it on Github with their web interface below.
Method # 2 – Pushing and merging your branch on Github
The method above is fine if you’re working solo, but if you’re working in a team, you will often push your branch up to Github, at which point it can be viewed by your team and merged into master using the GUI Github provides (there’s an actual merge button, etc.). In short – you’ll need to know how to do both.
Before proceeding – you will need a Github account.
To push code up to Github, use the following command
git branch
git checkout your_branch_name
git push -u origin your_branch_name
git branch– check to ensure you are in the correct branch, i.e. the one you want to push up, notmastergit checkout your_branch_name– if you are not already in your branchgit push -u origin your_branch_name– this does the magic of pushing your code up to Github, to your own fork of our code.
If everything worked as planned, you can now navigate over to the Github page of your fork to see that your branch, with changes, has been pushed up.
Creating a pull request on Github
The final step is of course, getting your code into the main repository. We will do this with a pull request. A pull request in Github’s own words
Pull requests let you tell others about changes you’ve pushed to a branch in a repository on GitHub. Once a pull request is opened, you can discuss and review the potential changes with collaborators and add follow-up commits before your changes are merged into the base branch.
https://help.github.com/en/articles/about-pull-requests
So, it’s basically where you submit your code for review – and once approved, the PR can be merged into master or whatever branch you want to merge into.
Go ahead now and click Compare & pull request on the page of your fork, shown below
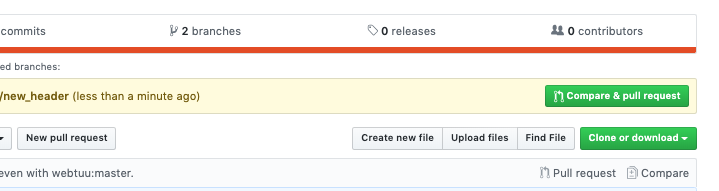
You should then be directed to our main repository, where you can click Create Pull Request and wait for your changes to be merged in.
Feel free to leave your pull request open for others to see, and your branch up on our repo. Changes won’t get merged in on this occasion – otherwise, there will be nothing to change for anyone else working through the tutorial in the future.
If you’ve made it this far – awesome work, and well done. What we’ve covered here should be enough to get you started on your git journey, and using it in your own projects. This part is important – following tutorials can only get you so far. You only really start to learn when you begin to play around with things yourself, so go ahead and explore the world of git!
New posts on Git, coming soon! Sign up for updates below to be notified of when I write more.
What if I don’t like using the command line?
Do you prefer using a UI instead of the command line? Once you grasp the basics of git, you may prefer to use GitKraken, which now includes AI features to make using git even easier. Use my referral link for 50% off their Pro plan.

Feedback
P.S. If for any reason you didn’t make it to the end of this tutorial – or anything wasn’t clear – get in touch below and I’ll be sure to reply with clarifications. If you struggled with any of it – chances are someone else did too, so feedback is very welcome – it helps me make the tutorial better for others!
Until next time… 😄 👋
Further reading
- What’s the difference between Git and Github?
- If you need a physical book, I highly recommend Pro Git by Scott Chacon – https://amzn.to/2RLpaD5
- https://git-scm.com/book/en/v1/Getting-Started-Git-Basics
- http://rogerdudler.github.io/git-guide/
- How I landed a remote job after doing a coding bootcamp